
Most Frequently Asked Questions
Badger App is a progressive web application (PWA). It is a type of application software delivered through the web, built using common web technologies including HTML, CSS and JavaScript. It is intended to work on any platform that uses a standards-compliant browser, including both desktop and mobile devices with modern internet connection.
On Android – Chrome browser
1) Using Chrome browser, open your production’s Badger login link and log in. For example https://stillking.badger.id
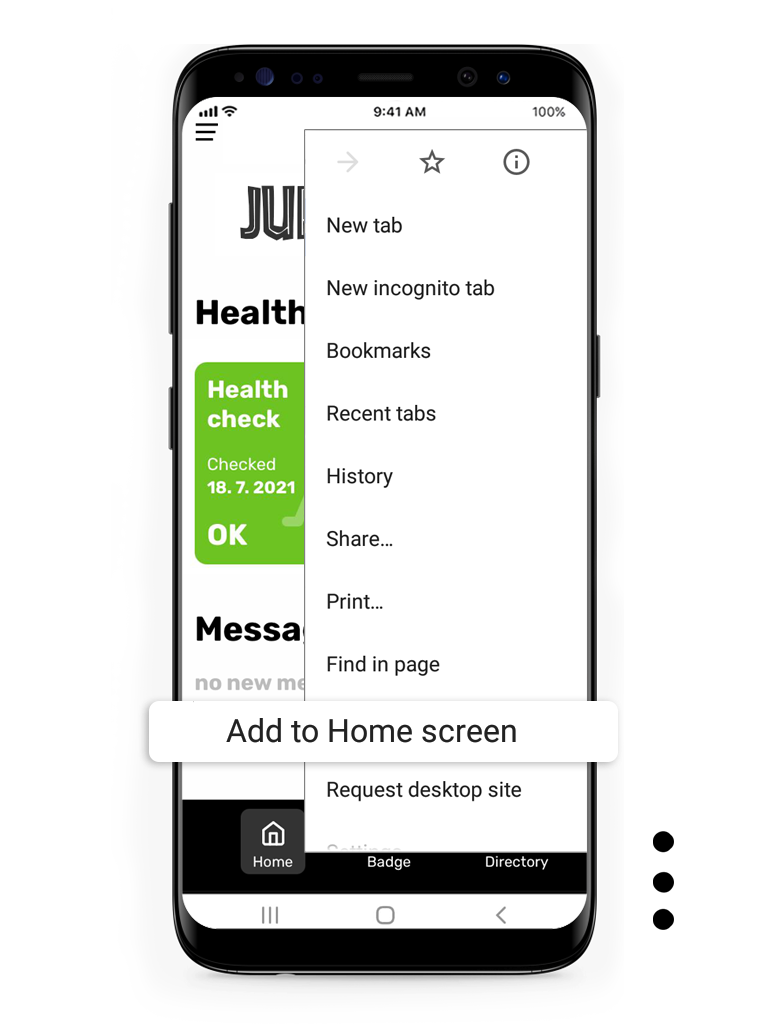
2) In the upper right corner click on three dots and from the menu select “Add to Home Screen”. You might have been previously prompted to install Badger into your phone.
3) You will now have a Badger icon ![]() on one of your desktops. You can hold and drag it into your home screen if you wish.
on one of your desktops. You can hold and drag it into your home screen if you wish.
On Apple – Safari browser
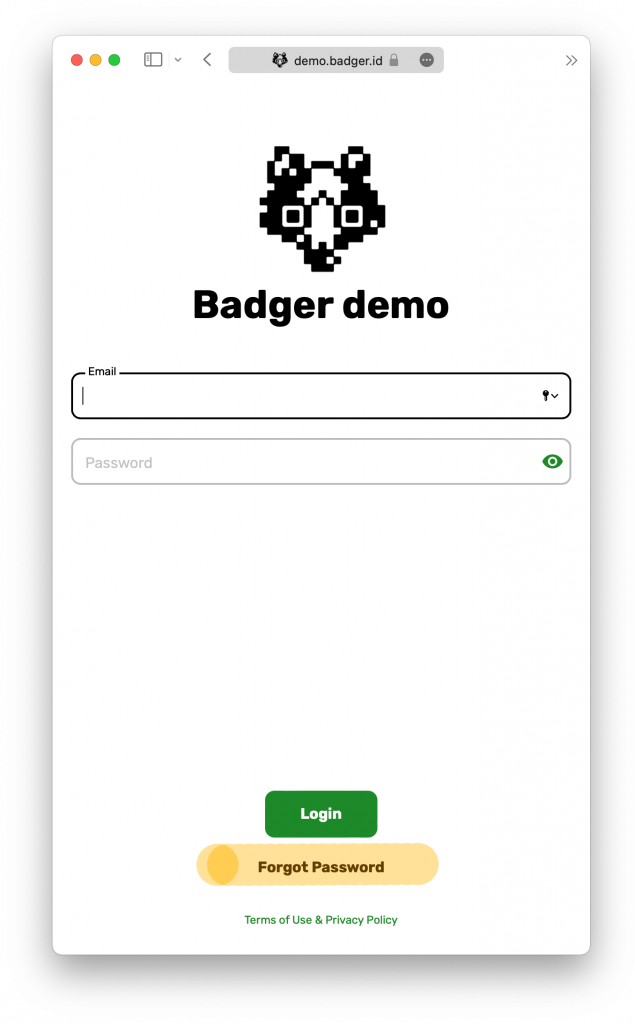
1) Using Safari browser, open your production’s Badger login link and log in. For example https://stillking.badger.id
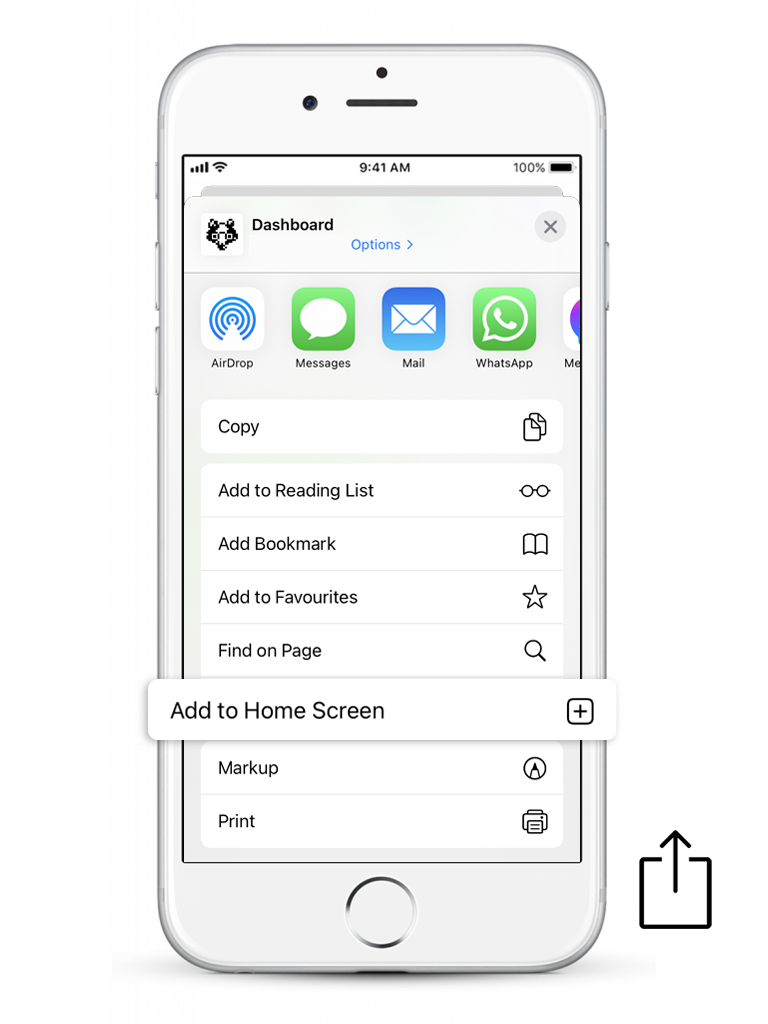
2) In the bottom of the screen, click on “Share” icon and from the menu select “Add to Home Screen”
3) You will now have a Badger icon ![]() on one of your desktops. You can hold and drag it into your home screen if you wish.
on one of your desktops. You can hold and drag it into your home screen if you wish.
In case you’ve forgotten your password or simply need to change it, follow these easy steps.

This will send you an email with a link to reset your password usually within 1 minute. Go to your inbox and click on the long link at the bottom of the email. In rare cases, please check your spam folder.
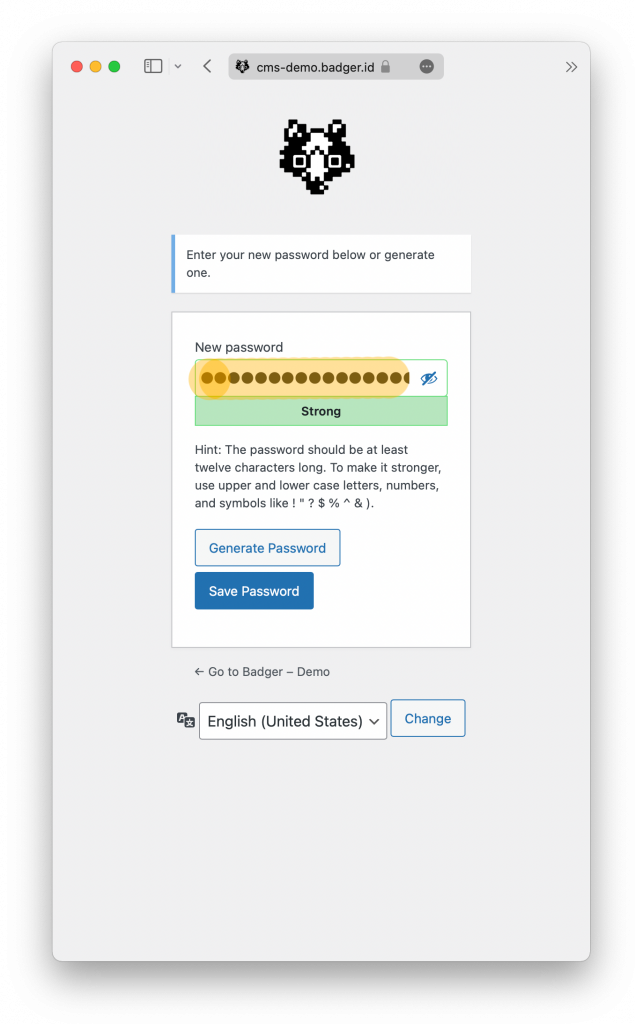
We recommend using a strong password with UPPER and lower-case letters as well as some digits and special characters. If you choose to use a weak password, check the warning box that will appear. You can also click on Generate Password for a strong computer-generated password. Save your password when prompted by the browser.
About Badger
Badger is an progressive web app that can be accessed on any internet-enabled device. It consists of a front-end interface used on handheld devices by your crew and a powerful back-end admin interface for the production and covid departments. Badger helps your crew minimize time spent on tedious and repetitive Covid agendas such as everyday health checks and the entire Covid testing process. Badger gives Covid department real-time oversight of all of your crew’s health, test results and vaccination status. With just a few clicks, Badger coordinates testing across multiple testing sites and quickly and securely distributes Covid test results. Everyone is connected in one powerful directory with photos, validated phone numbers and emails for improved communication among your team. You can also use Badger for lunch orders.
Yes! Badger is an online service so you can use it anywhere you are online. You can try out Badger free of charge to see if it suits your needs. You do not need to install any additional software. All you need is the gear everyone already has – computers and phones. The best thing is to get your producer, production team and Covid department together to have a chat about how Badger will speed-up your work so that you can focus on the important stuff.
Yes and no. As of now, the key language used to navigate the Badger app and the admin interface is English. However, email templates, the health check questionnaire and lunch menus can be modified to any language or be multi-lingual, in case you’re shooting with a crew from various countries.
Short answer – about a week.
Longer answer – it takes about 2-3 days to set-up your subdomain (whatever-name.badger.id) and project details along with logos and badge designs. We also need to carry over legal wording of Covid testing and GDPR waivers for your project – these are the terms users agree to during onboarding. We can also customize the email templates Badger sends our to your crew. We should be able to ship our hardware to you within a week, depending on your location. Once that’s done, we’d like to spend some time with your key personnel and walk them through the whole system so that your team gets the most out of Badger and they are comfortable using it.
To get started, let us know the following:
- Your production and project names
- Who is your Production Coordinator and Head of Covid
- When do you start prep, when will you start shooting and when are you expected to wrap
- Does your project have a logo?
- Where will you be prepping and shooting?
- How many crew do you expect to have on your project?
- Do you already have a lab that you’d like to work with?
- Do you put pineapple on your pizza?
Digital and Printed Badges
Absolutely yes! As of now, Badger generates standard credit card sized badges in the portrait format – height of 3.37 inches (85.6 mm), width of 2.125 (53.98 mm). You can design your custom background and add your project’s logo on the badge. Once you’re happy, you can print out badges for the whole crew in a few simple clicks and keep track of who already got theirs. Download a Photoshop (.psd) template below to create an exciting badge design everyone will love!
There are several ways how to print badges using Badger. Here’s one we think is the most common.
(2) You can use various search fields and filters to find the person you’re looking for.
(3) This column shows which badges have been printed and handed over.
(2) Click Handed over to check this person’s Badge status for your record keeping.
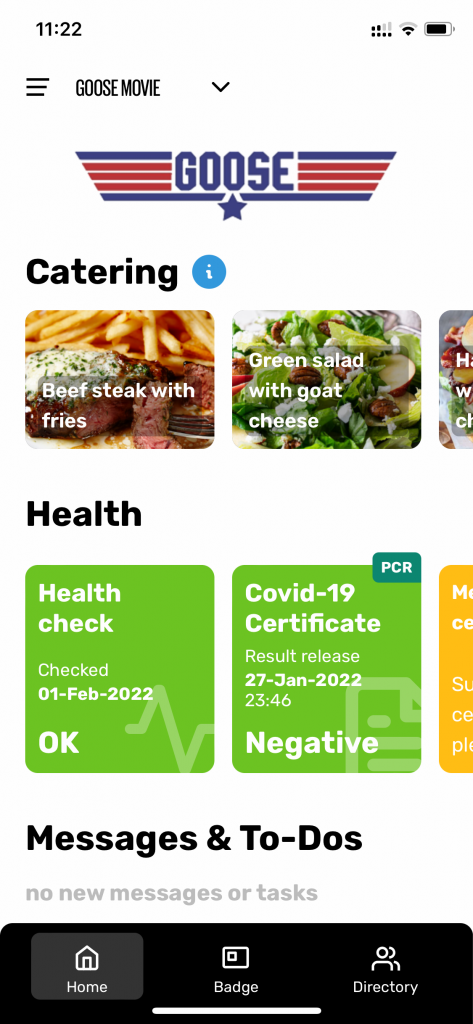
Your digital badge is as good as your physical one. You can show it to a security guard or a Covid marshal. The advantage of the digital badge is that it dynamically shows, if you’ve done your Daily Health Check, have a valid and recent Covid test result and if your vaccination status is valid. It also displays if you are allowed to take pictures on set. Your badge contains your unique QR code that identifies you during testing or various other tasks where you might be required to check in. You can use both the physical and digital badge.
(1) Your photo that you have uploaded during registration.
(2) Your project’s logo.
(3) Daily Health Check status – Green – OK, Red – not OK, Gray – not yet filled.
(4) Covid test status. Green – cleared, Red – not cleared, Gray – expired, Light Green – expires soon.
(5) Vaccination status – Turquoise – valid, Yellow – unavailable.
(6) Your selected job title.
(7) Custom badge background for your project.
(8) Unique QR code that identifies you on this project, but doesn’t contain any personal information about you.
(9) The important one! – Your name.
(10) On-set camera privileges – Green – yes, Gray – no.
Covid Management
It’s really easy to let your crew know about their next Covid testing session. Let’s go through it step by step.
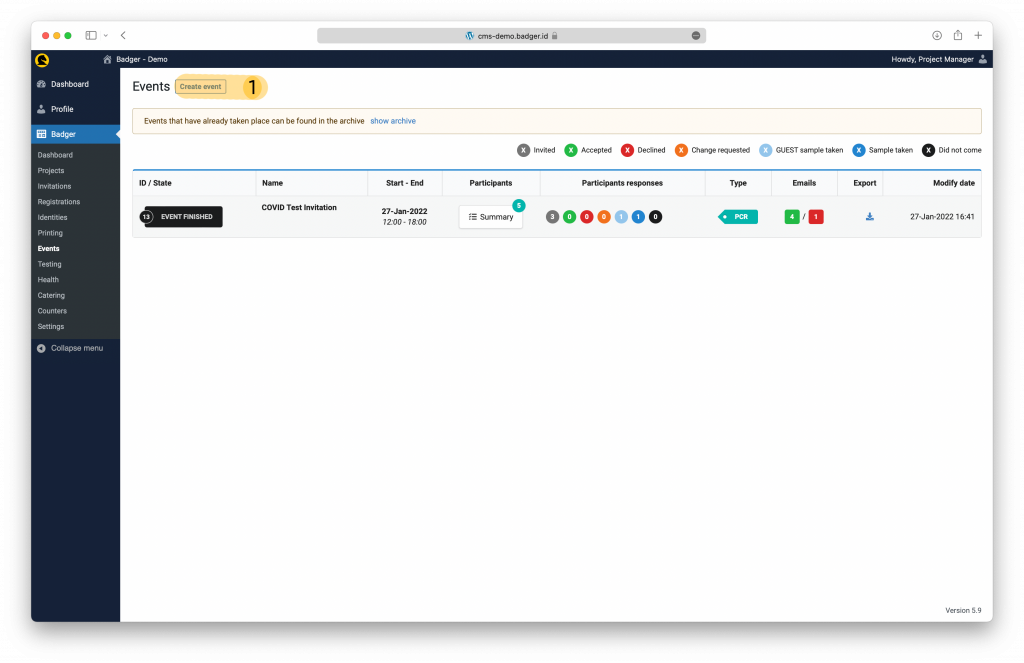
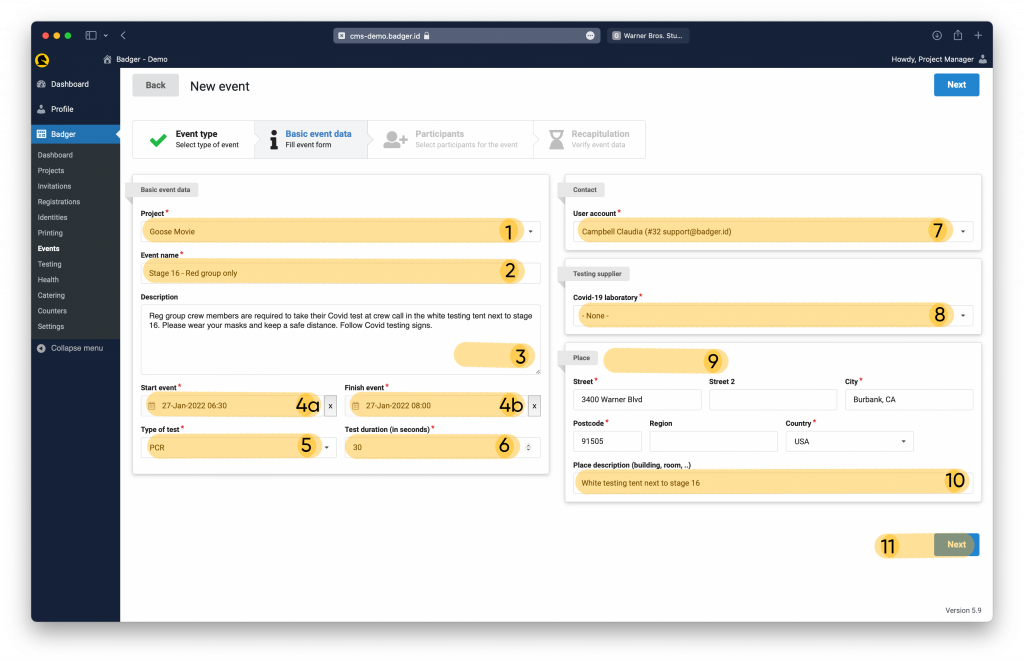
(1) Make sure you’ve selected the right project in case you use Badger on more projects under the same production.
(2) Name your event. For example Stage 16 – Red zone testing only.
(3) Here you can write custom instructions your crew will receive in the app reminder and in their emails.
(4) Specify the start and finish of your testing event.
(5) Choose between PCR or Antigen test type.
(6) Choose the testing time interval in seconds. This is how quickly your swabbers can go. The administrative agenda (scanning badge QR code and printing a vial label) takes about 10 seconds per user with Badger.
(7) Choose the contact person on-site.
(8) Choose your lab service provider
(9) Specify the address where testing will take place.
(10) Add an additional note to the address. For example door #, floor, W3W link, etc.
(11) Once done, click Next.

(1) Select one or more users by looking up their name or email.
(2) Add whole departments.
(3) Add people by their zone/pod/group assignment.
(4) Add people by copying and pasting a list of emails
(5) Drag and drop users to change their order
(6) See for what time a user is being invited
(7) See the name, department, position and email of the invited individual
(8) See the person’s last Covid test date
(9) Click Next.

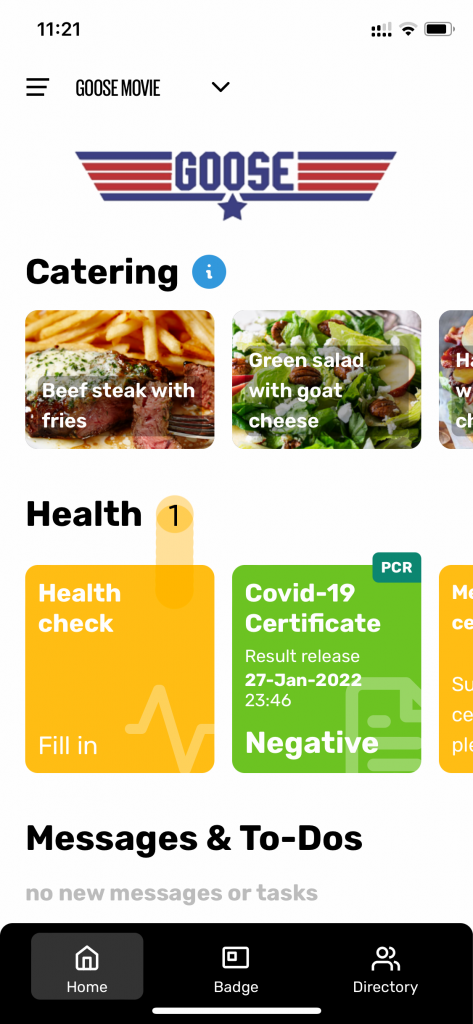
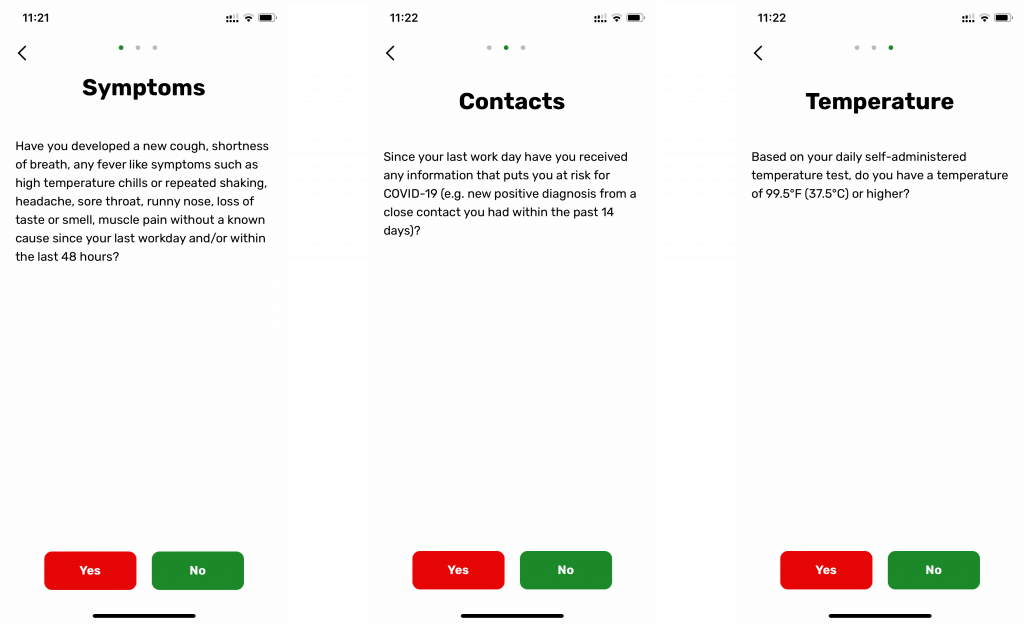
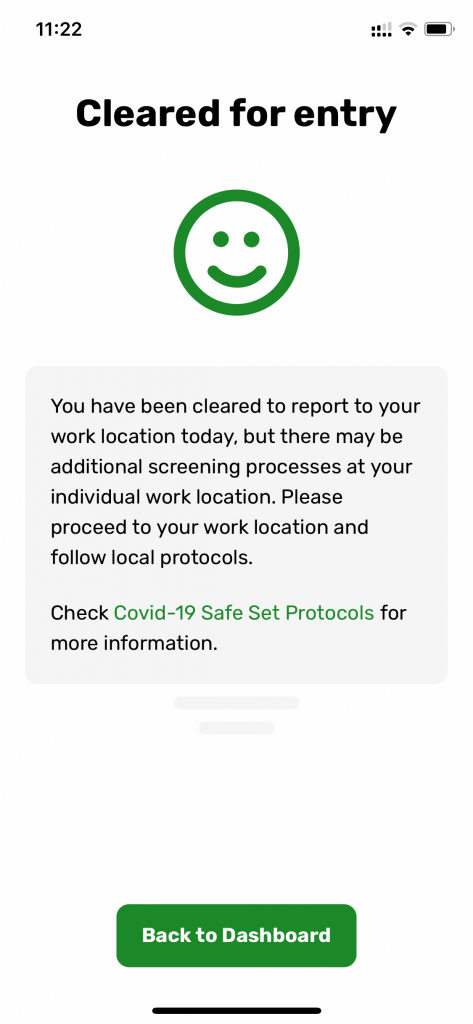
Filling out your Daily Health Check is easy and quick
User Onboarding
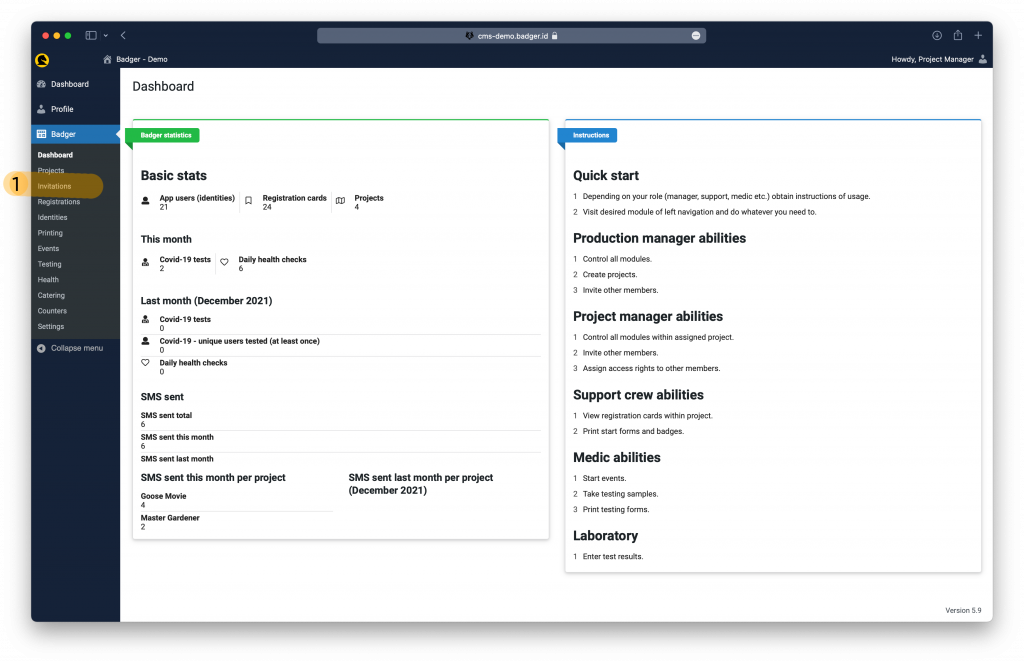
Adding crew to your project in Badger can be done in several ways. You can send an email invite to one or more crew members at a time, you can generate a link and turn it into a QR code or you can add people manually.
Sending out email invites to new crew:
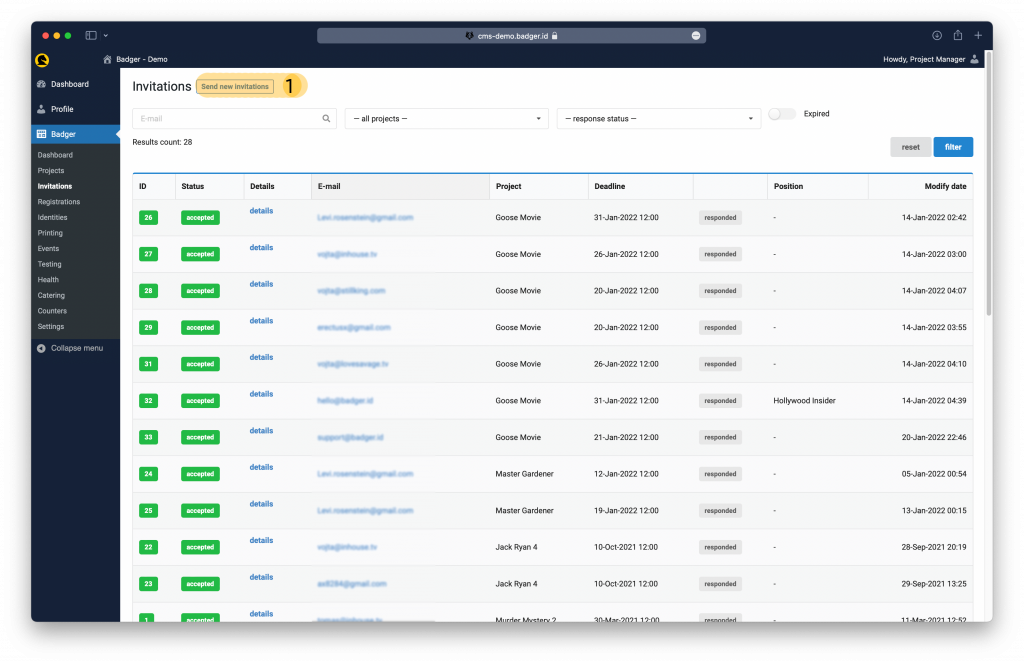
*On this screen, you can see the crew members you’ve already invited and their status: Pending, Accepted and Declined. This way you can monitor who hasn’t registered yet and chase them however you please – perhaps by sending a new invitation.
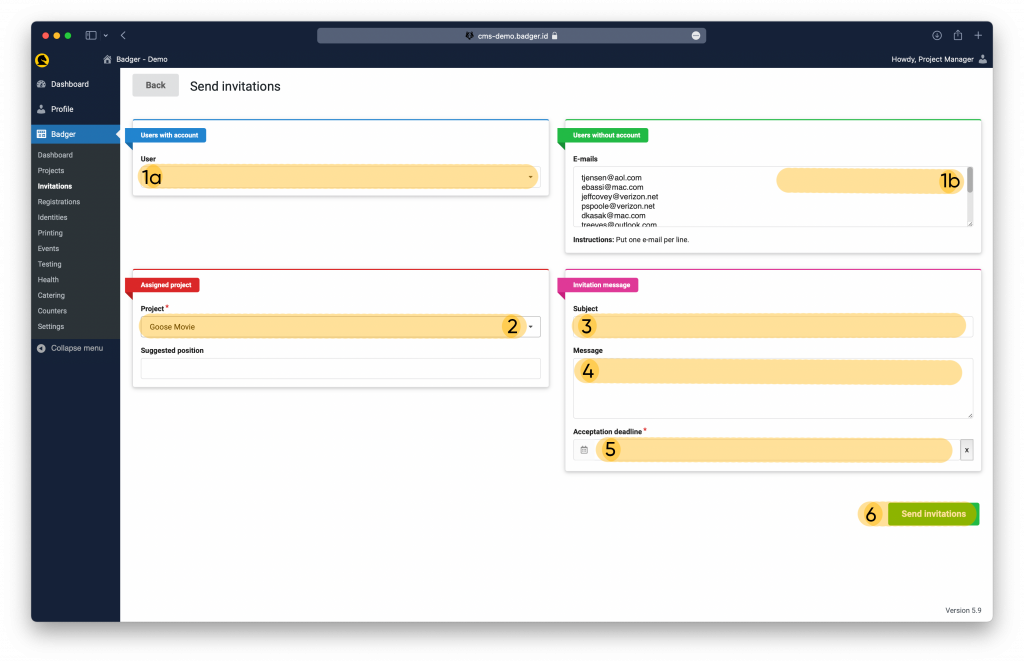
(1b) Copy and paste one or multiple emails (each on one line with no spaces) in the green Users without account section.
(2) Select the right project, in case you are running more than one production.
(3) You may type a custom subject of the invite email or leave it blank.
(4) You may insert a custom message to be added to the existing invite email template, or leave it blank.
(5) Give your crew member(s) a deadline until they can register. The invitation link will inactivate after the given deadline.
(6) Click on Send Invitations. This will send out an email to everyone you’ve specified asking them to join the project.
In case a crew member doesn’t receive your email, please advise them to first check their spam folder and make sure you’ve typed their email correctly.
Most Frequently Asked Questions
Badger App is a progressive web application (PWA). It is a type of application software delivered through the web, built using common web technologies including HTML, CSS and JavaScript. It is intended to work on any platform that uses a standards-compliant browser, including both desktop and mobile devices with modern internet connection.
On Android – Chrome browser
1) Using Chrome browser, open your production’s Badger login link and log in. For example https://stillking.badger.id
2) In the upper right corner click on three dots and from the menu select “Add to Home Screen”. You might have been previously prompted to install Badger into your phone.
3) You will now have a Badger icon ![]() on one of your desktops. You can hold and drag it into your home screen if you wish.
on one of your desktops. You can hold and drag it into your home screen if you wish.
On Apple – Safari browser
1) Using Safari browser, open your production’s Badger login link and log in. For example https://stillking.badger.id
2) In the bottom of the screen, click on “Share” icon and from the menu select “Add to Home Screen”
3) You will now have a Badger icon ![]() on one of your desktops. You can hold and drag it into your home screen if you wish.
on one of your desktops. You can hold and drag it into your home screen if you wish.
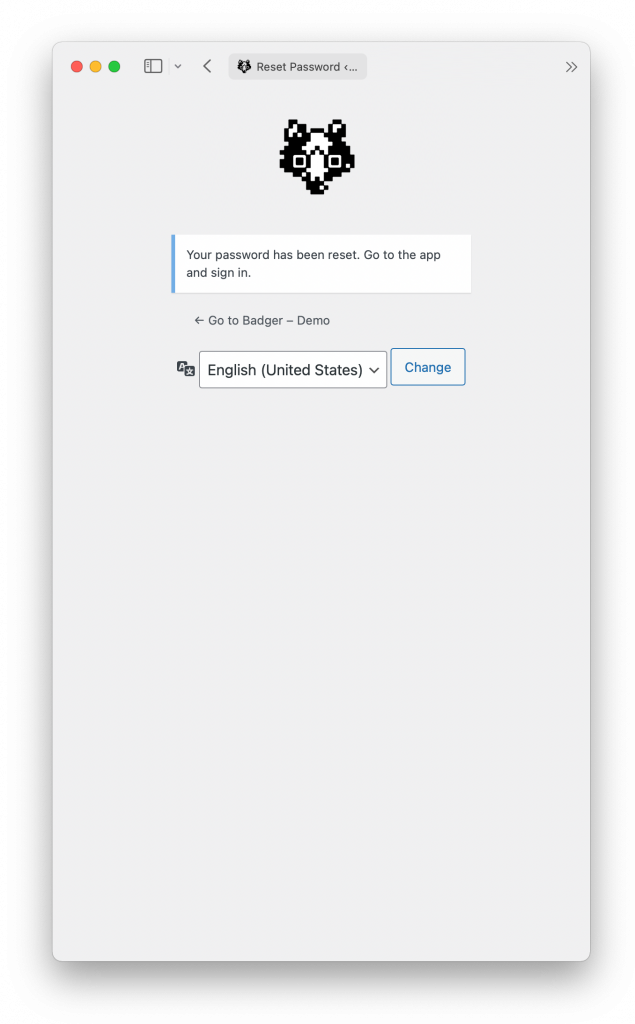
In case you’ve forgotten your password or simply need to change it, follow these easy steps.
This will send you an email with a link to reset your password usually within 1 minute. Go to your inbox and click on the long link at the bottom of the email. In rare cases, please check your spam folder.
We recommend using a strong password with UPPER and lower-case letters as well as some digits and special characters. If you choose to use a weak password, check the warning box that will appear. You can also click on Generate Password for a strong computer-generated password. Save your password when prompted by the browser.
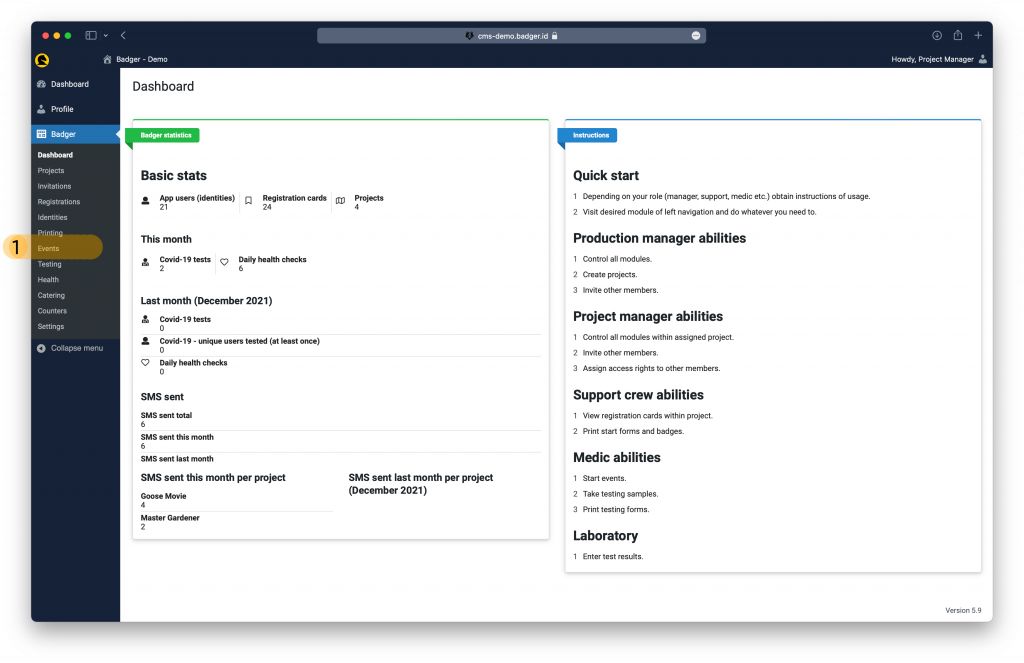
About Badger
Badger is an progressive web app that can be accessed on any internet-enabled device. It consists of a front-end interface used on handheld devices by your crew and a powerful back-end admin interface for the production and covid departments. Badger helps your crew minimize time spent on tedious and repetitive Covid agendas such as everyday health checks and the entire Covid testing process. Badger gives Covid department real-time oversight of all of your crew’s health, test results and vaccination status. With just a few clicks, Badger coordinates testing across multiple testing sites and quickly and securely distributes Covid test results. Everyone is connected in one powerful directory with photos, validated phone numbers and emails for improved communication among your team. You can also use Badger for lunch orders.
Yes! Badger is an online service so you can use it anywhere you are online. You can try out Badger free of charge to see if it suits your needs. You do not need to install any additional software. All you need is the gear everyone already has – computers and phones. The best thing is to get your producer, production team and Covid department together to have a chat about how Badger will speed-up your work so that you can focus on the important stuff.
Yes and no. As of now, the key language used to navigate the Badger app and the admin interface is English. However, email templates, the health check questionnaire and lunch menus can be modified to any language or be multi-lingual, in case you’re shooting with a crew from various countries.
Short answer – about a week.
Longer answer – it takes about 2-3 days to set-up your subdomain (whatever-name.badger.id) and project details along with logos and badge designs. We also need to carry over legal wording of Covid testing and GDPR waivers for your project – these are the terms users agree to during onboarding. We can also customize the email templates Badger sends our to your crew. We should be able to ship our hardware to you within a week, depending on your location. Once that’s done, we’d like to spend some time with your key personnel and walk them through the whole system so that your team gets the most out of Badger and they are comfortable using it.
To get started, let us know the following:
- Your production and project names
- Who is your Production Coordinator and Head of Covid
- When do you start prep, when will you start shooting and when are you expected to wrap
- Does your project have a logo?
- Where will you be prepping and shooting?
- How many crew do you expect to have on your project?
- Do you already have a lab that you’d like to work with?
- Do you put pineapple on your pizza?
Digital and Printed Badges
Absolutely yes! As of now, Badger generates standard credit card sized badges in the portrait format – height of 3.37 inches (85.6 mm), width of 2.125 (53.98 mm). You can design your custom background and add your project’s logo on the badge. Once you’re happy, you can print out badges for the whole crew in a few simple clicks and keep track of who already got theirs. Download a Photoshop (.psd) template below to create an exciting badge design everyone will love!
There are several ways how to print badges using Badger. Here’s one we think is the most common.
(2) You can use various search fields and filters to find the person you’re looking for.
(3) This column shows which badges have been printed and handed over.
(2) Click Handed over to check this person’s Badge status for your record keeping.
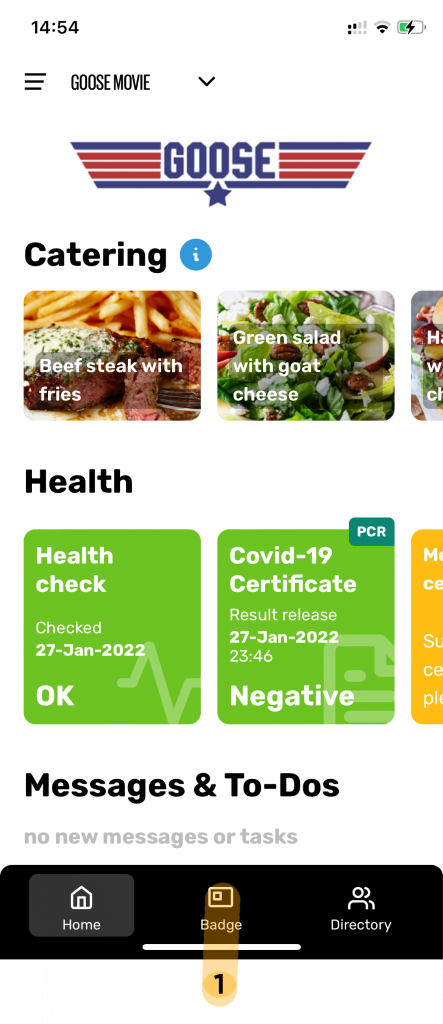
Your digital badge is as good as your physical one. You can show it to a security guard or a Covid marshal. The advantage of the digital badge is that it dynamically shows, if you’ve done your Daily Health Check, have a valid and recent Covid test result and if your vaccination status is valid. It also displays if you are allowed to take pictures on set. Your badge contains your unique QR code that identifies you during testing or various other tasks where you might be required to check in. You can use both the physical and digital badge.
(1) Your photo that you have uploaded during registration.
(2) Your project’s logo.
(3) Daily Health Check status – Green – OK, Red – not OK, Gray – not yet filled.
(4) Covid test status. Green – cleared, Red – not cleared, Gray – expired, Light Green – expires soon.
(5) Vaccination status – Turquoise – valid, Yellow – unavailable.
(6) Your selected job title.
(7) Custom badge background for your project.
(8) Unique QR code that identifies you on this project, but doesn’t contain any personal information about you.
(9) The important one! – Your name.
(10) On-set camera privileges – Green – yes, Gray – no.
Covid Management
It’s really easy to let your crew know about their next Covid testing session. Let’s go through it step by step.
(1) Make sure you’ve selected the right project in case you use Badger on more projects under the same production.
(2) Name your event. For example Stage 16 – Red zone testing only.
(3) Here you can write custom instructions your crew will receive in the app reminder and in their emails.
(4) Specify the start and finish of your testing event.
(5) Choose between PCR or Antigen test type.
(6) Choose the testing time interval in seconds. This is how quickly your swabbers can go. The administrative agenda (scanning badge QR code and printing a vial label) takes about 10 seconds per user with Badger.
(7) Choose the contact person on-site.
(8) Choose your lab service provider
(9) Specify the address where testing will take place.
(10) Add an additional note to the address. For example door #, floor, W3W link, etc.
(11) Once done, click Next.
(1) Select one or more users by looking up their name or email.
(2) Add whole departments.
(3) Add people by their zone/pod/group assignment.
(4) Add people by copying and pasting a list of emails
(5) Drag and drop users to change their order
(6) See for what time a user is being invited
(7) See the name, department, position and email of the invited individual
(8) See the person’s last Covid test date
(9) Click Next.
Filling out your Daily Health Check is easy and quick
User Onboarding
Adding crew to your project in Badger can be done in several ways. You can send an email invite to one or more crew members at a time, you can generate a link and turn it into a QR code or you can add people manually.
Sending out email invites to new crew:
*On this screen, you can see the crew members you’ve already invited and their status: Pending, Accepted and Declined. This way you can monitor who hasn’t registered yet and chase them however you please – perhaps by sending a new invitation.
(1b) Copy and paste one or multiple emails (each on one line with no spaces) in the green Users without account section.
(2) Select the right project, in case you are running more than one production.
(3) You may type a custom subject of the invite email or leave it blank.
(4) You may insert a custom message to be added to the existing invite email template, or leave it blank.
(5) Give your crew member(s) a deadline until they can register. The invitation link will inactivate after the given deadline.
(6) Click on Send Invitations. This will send out an email to everyone you’ve specified asking them to join the project.
In case a crew member doesn’t receive your email, please advise them to first check their spam folder and make sure you’ve typed their email correctly.